SpringBoot详解
2024.07.25 阅读量次概览
SpringBoot是由Pivotal团队提供的全新框架,其设计目的是用来简化Spring应用的初始搭建以及开发过程。该框架使用了特定的方式来进行配置,从而使开发人员不再需要定义样板化的配置。SpringBoot提供了一种新的编程范式,可以更加快速便捷地开发Spring项目,在开发过程当中可以专注于应用程序本身的功能开发,而无需在Spring配置上花太大的工夫。
SpringBoot基于Sring4进行设计,继承了原有Spring框架的优秀基因。SpringBoot准确的说并不是一个框架,而是一些类库的集合。
maven或者gradle项目导入相应依赖即可使用 SpringBoot,而无需自行管理这些类库的版本。
特点:
- 自动配置:SpringBoot提供自动配置功能,根据项目的依赖和环境自动设置 Spring应用程序,减少了手动配置的复杂度。
- 启动器:SpringBoot提供“启动器”依赖集合,如
spring-boot-starter-web,简化了项目的依赖管理。 - 嵌入式服务器:SpringBoot支持嵌入式服务器,如
Tomcat、Jetty和Undertow,使得应用程序可以独立运行,无需外部Web服务器。 - 生产级别的特性:SpringBoot具备生产级别的功能,包括健康检查、应用监控、日志管理等。Actuator 模块可以轻松监控和管理应用程序。
- 无配置的约定:SpringBoot遵循“无配置”的原则,使用合理的默认值和约定,减少需要编写的配置代码。
- 快速开发:SpringBoot的项目结构和默认配置帮助开发者快速启动新项目。内置工具和插件支持开发、测试和部署。
与Spring区别
Spring提供了大量的子模块,如Spring Core、Spring Web、Spring Data等,但它们的配置复杂度较高,且需要开发者手动配置各类文件和依赖。 SpringBoot基于Spring,目的是简化Spring应用的创建和配置。
SpringBoot是对Spring的扩展,简化了Spring应用开发的过程,但仍然依赖Spring核心库。 使用SpringBoot开发的应用实际上是基于Spring的,只是通过自动配置和内置依赖提升了开发效率。
Spring和SpringBoot的主要区别在于配置和启动的复杂性。Spring框架需要大量的手动配置,包括XML配置文件或Java配置类,配置过程较为繁琐且易出错。 此外,Spring应用程序通常需要部署到外部的Web服务器,并需要额外的步骤来启动和运行。
相比之下,SpringBoot提供了自动配置功能,可以根据项目的依赖自动设置应用程序,极大地简化了配置工作。
它还支持嵌入式服务器,使得应用程序能够独立运行,无需外部 Web 服务器,且可以通过java -jar命令直接启动。这些特点使得SpringBoot更加适合快速开发和部署应用程序。
创建SpringBoot项目
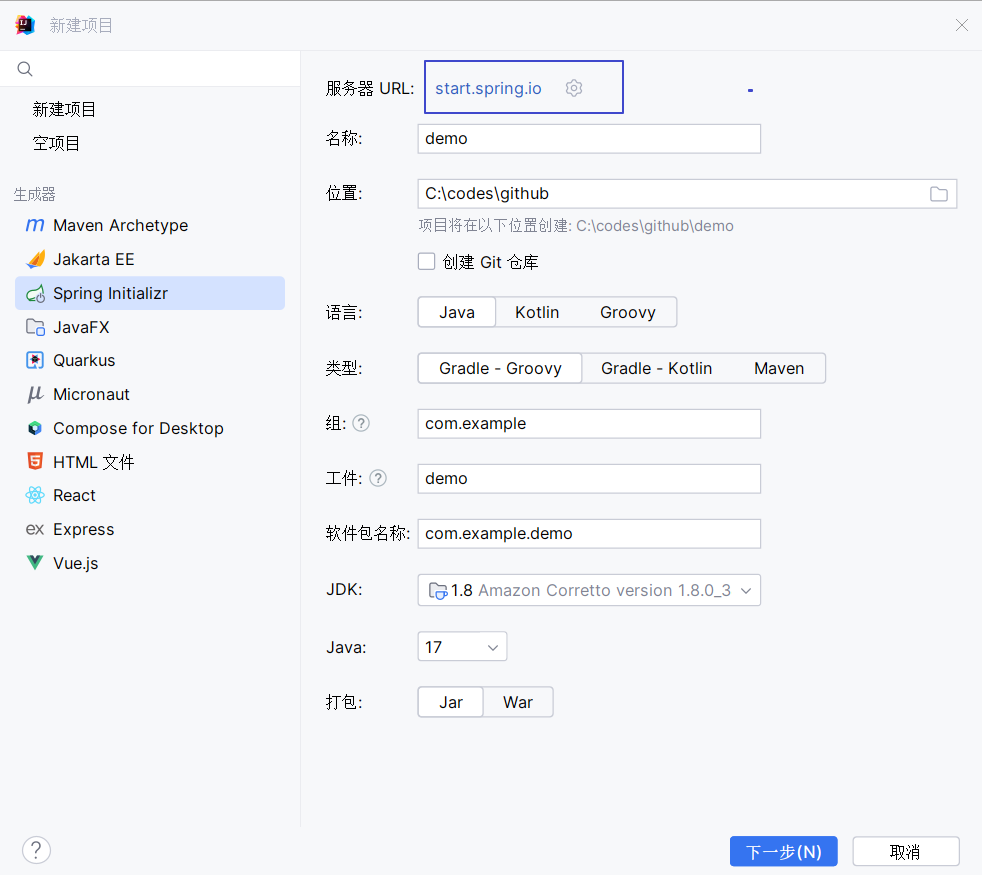
在IDEA中使用Spring Initializr快速创建一个SpringBoot项目。
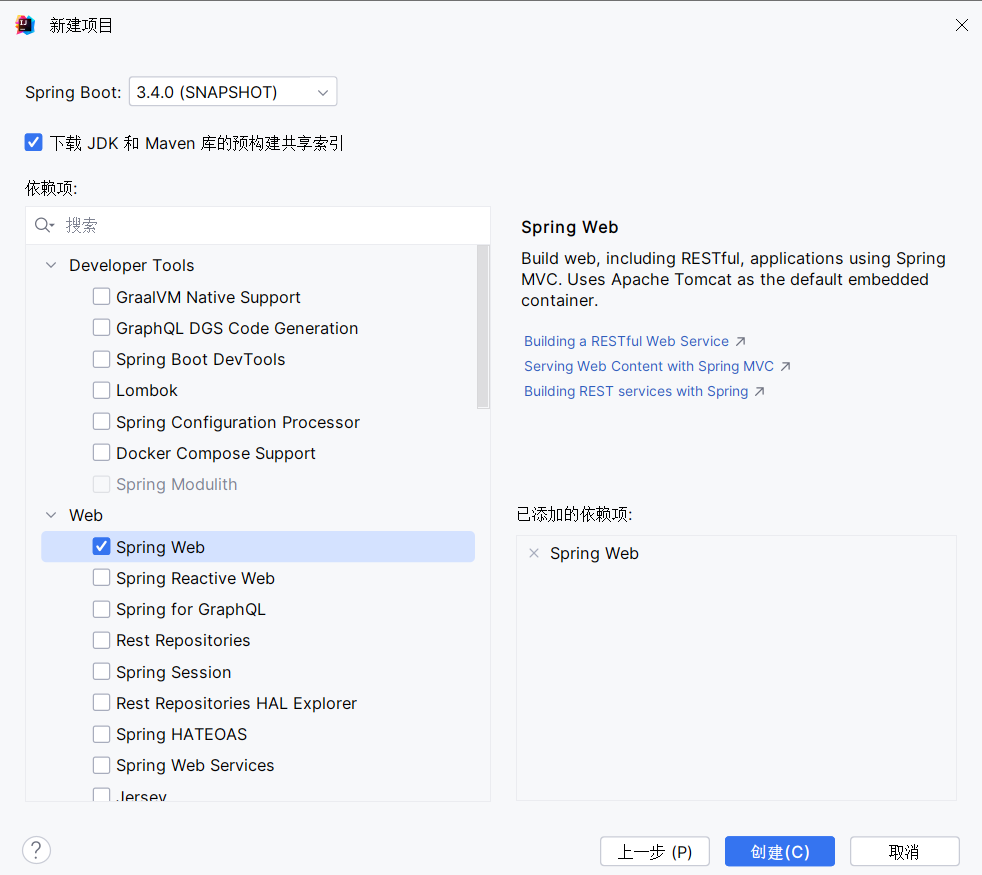
选择所需的依赖
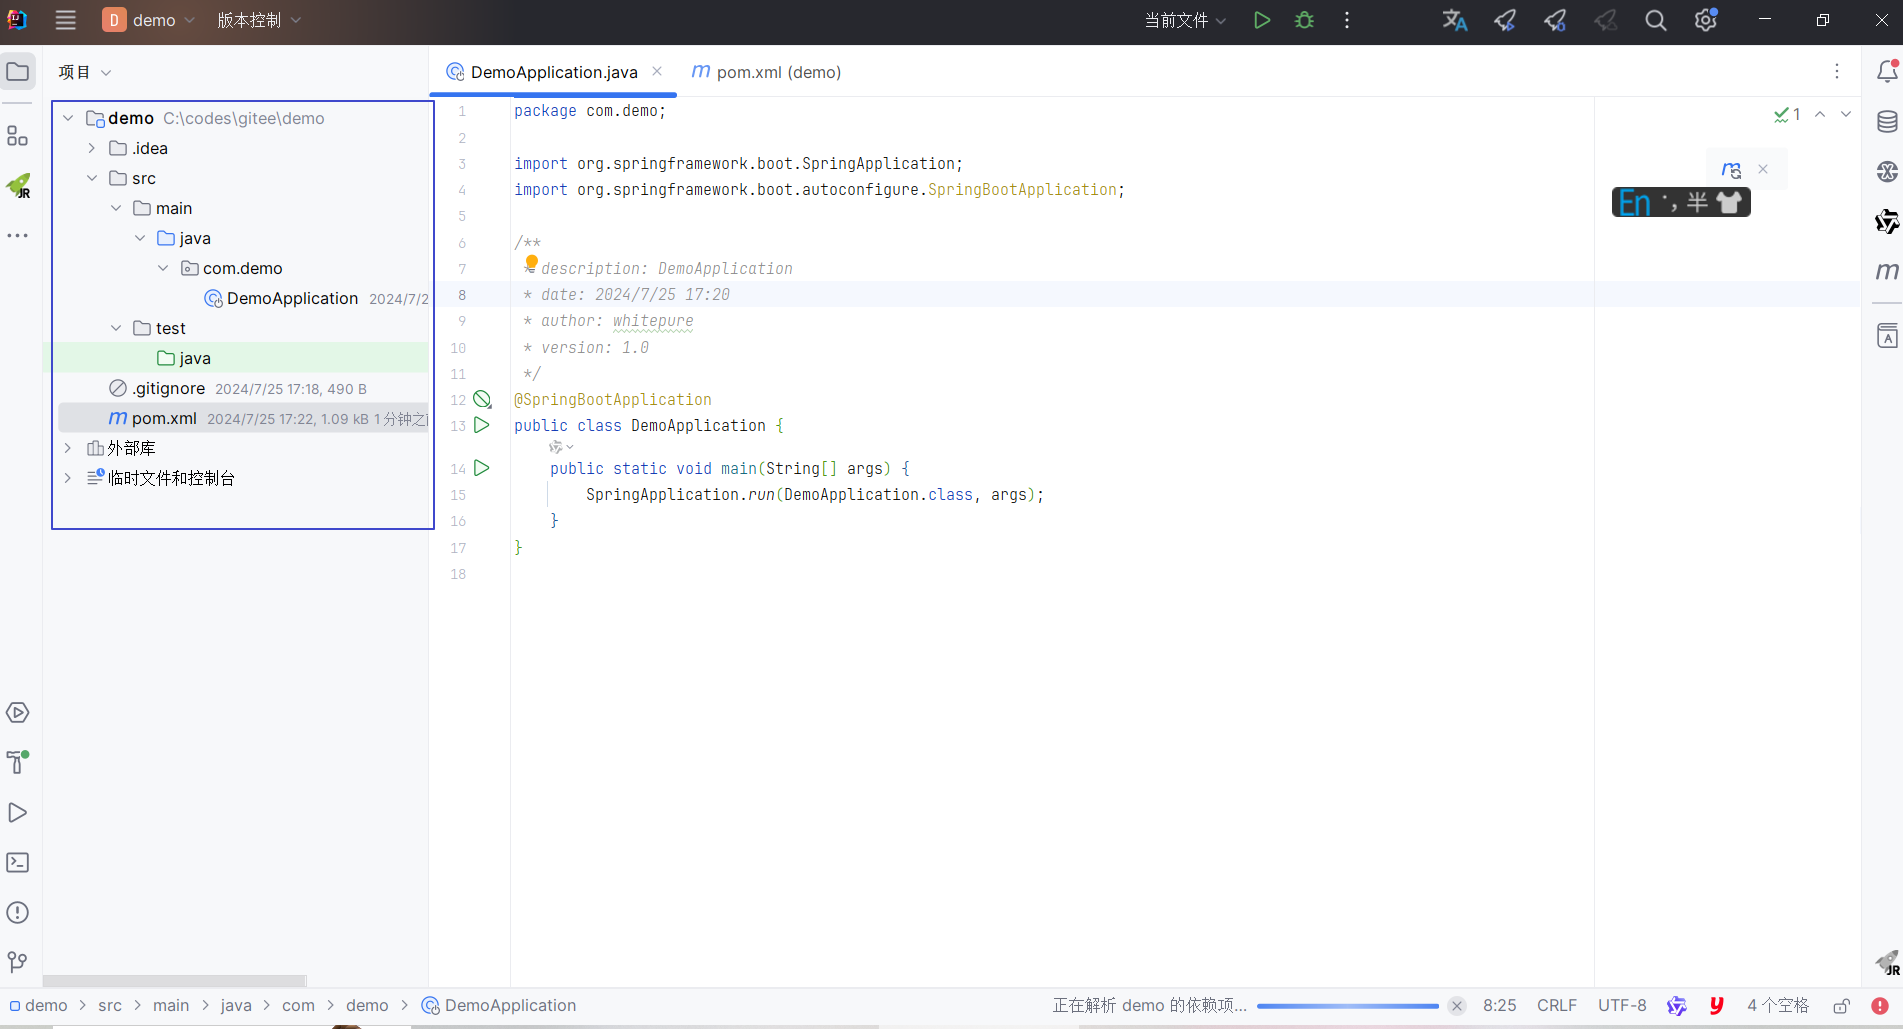
SpringBoot项目通常包括以下几个主要部分:
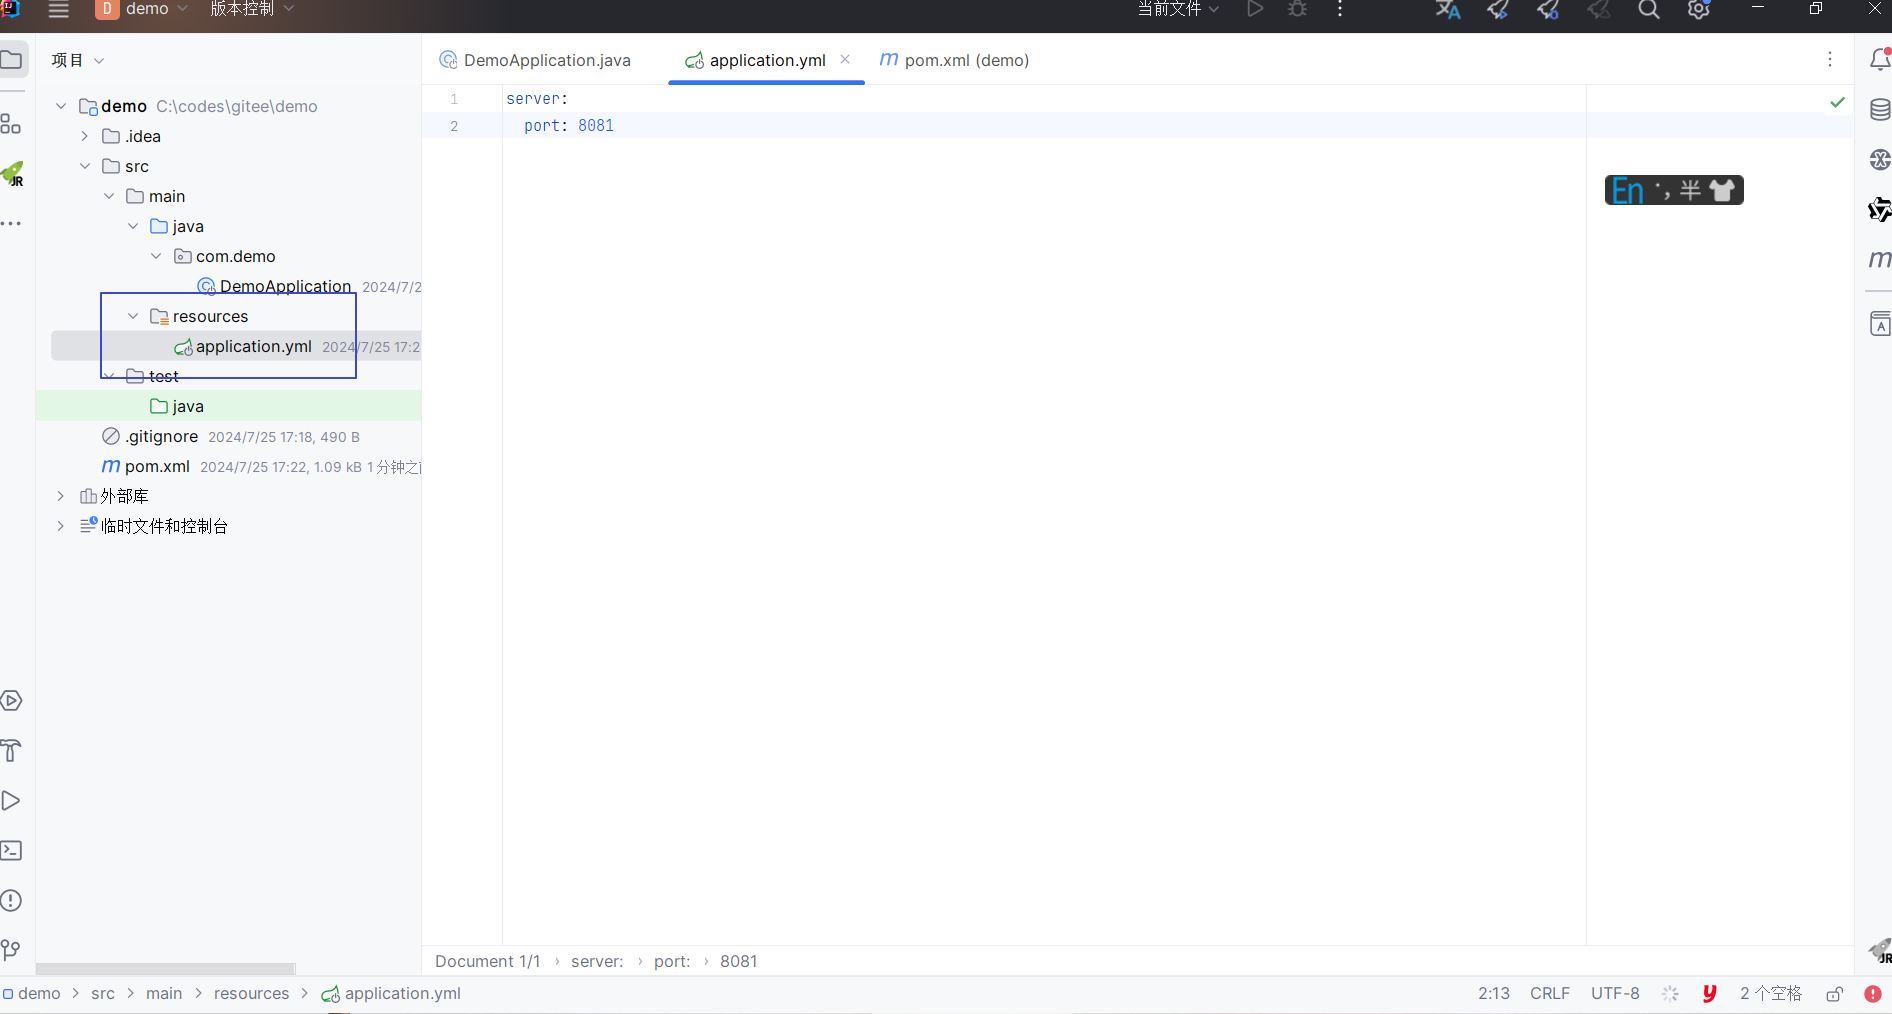
在src/main/resources目录下创建application.properties或application.yml文件来配置应用程序。示例配置如下:
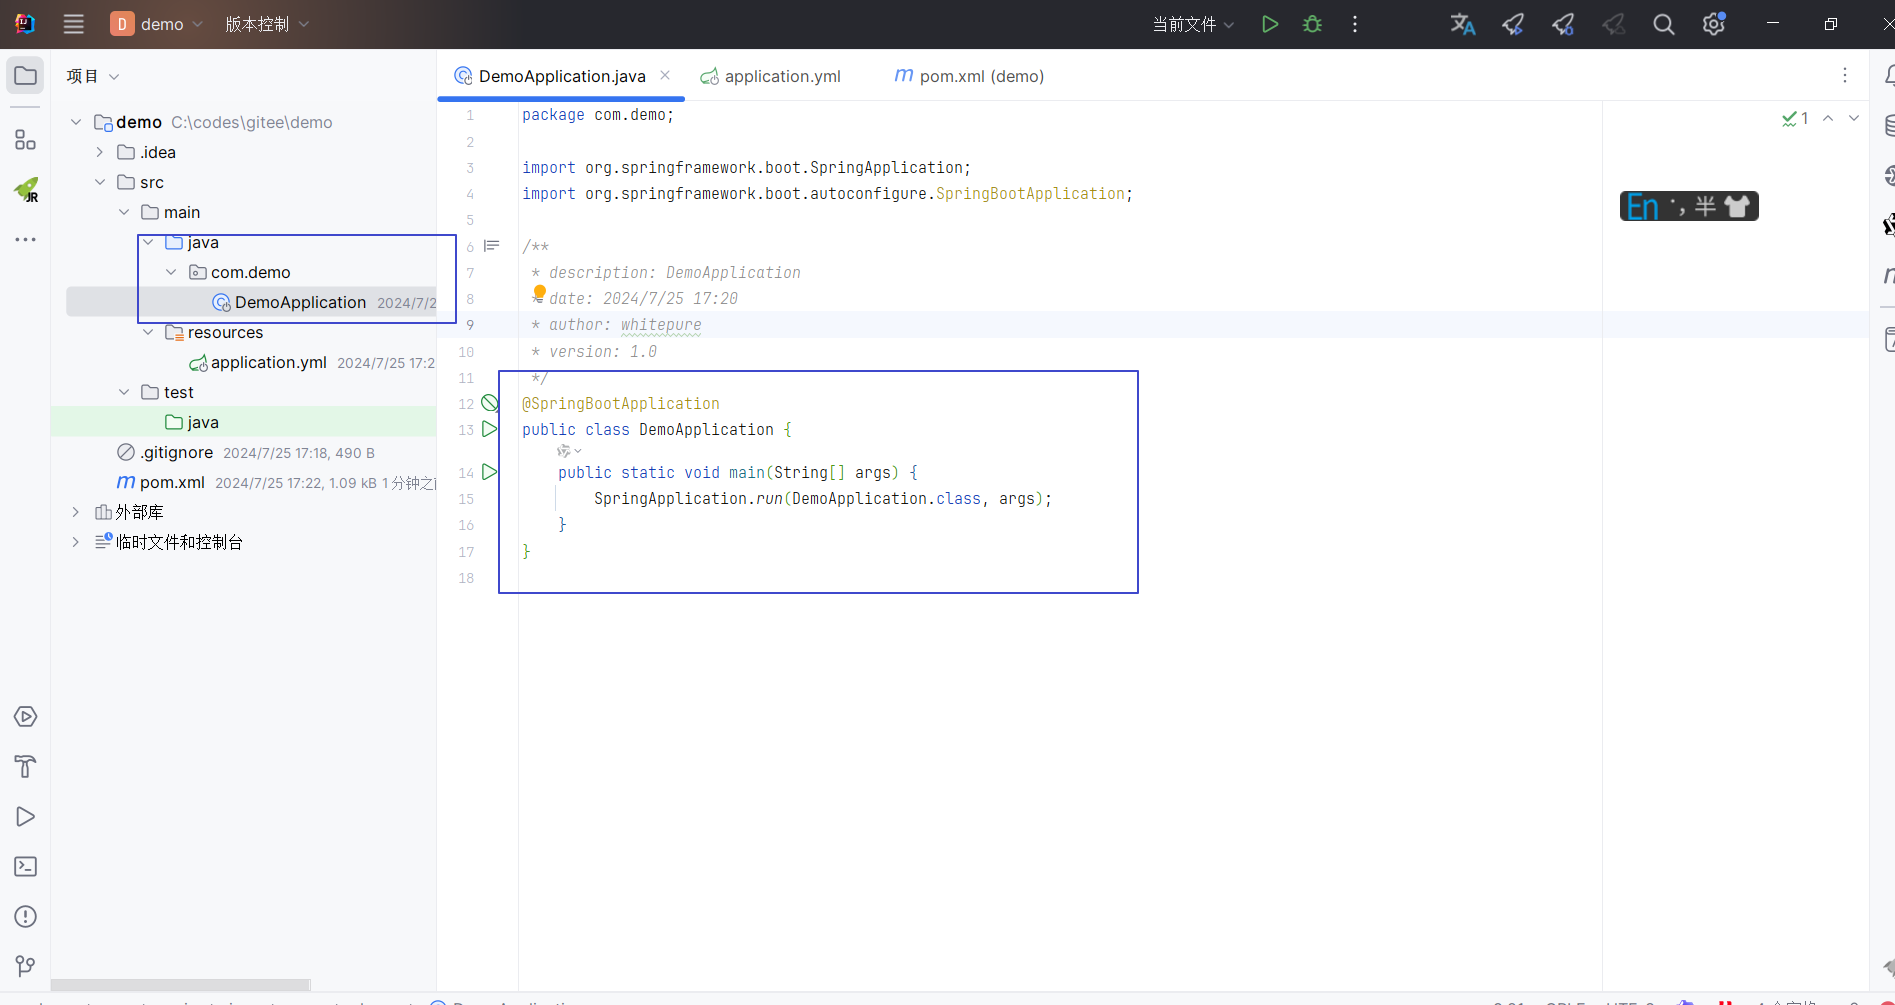
主应用类通常位于项目的根包,并使用@SpringBootApplication注解。
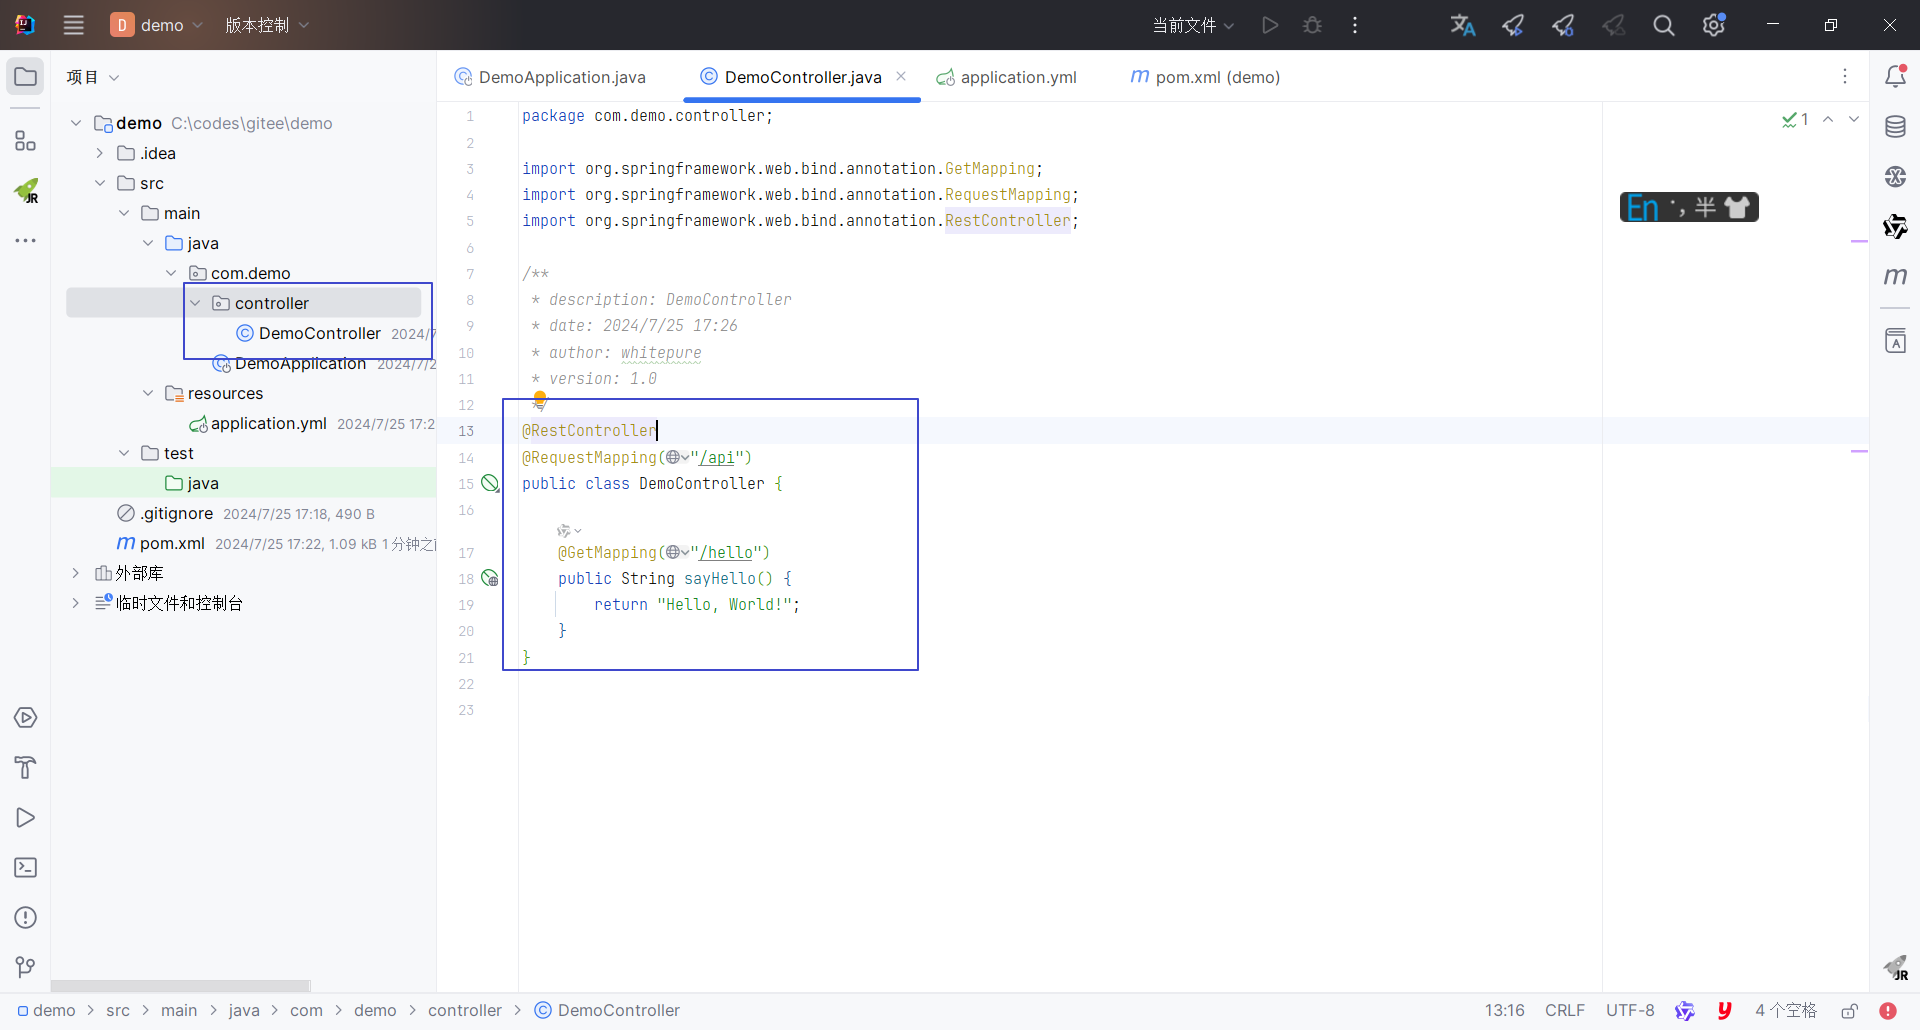
创建一个Controller处理HTTP请求并返回响应。使用@RestController注解定义控制器,使用@RequestMapping或@GetMapping处理请求。
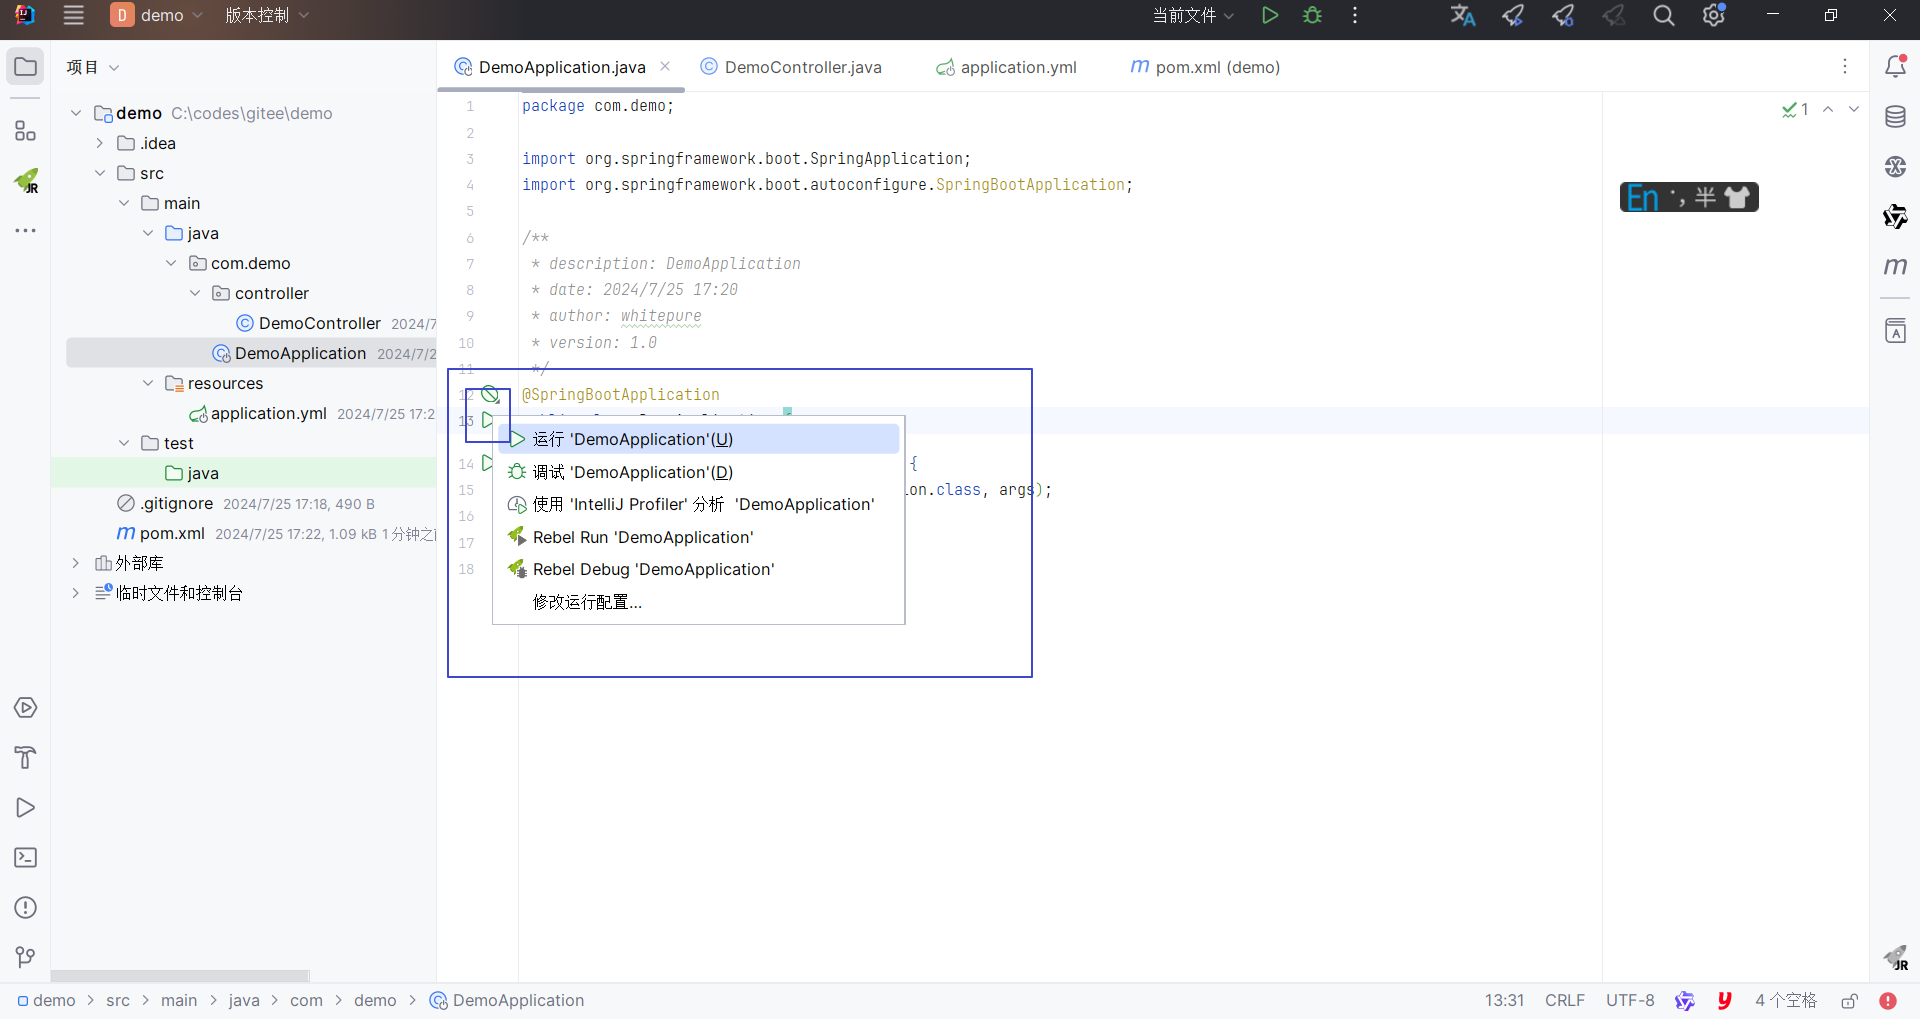
在IDE中运行,右击主应用类并选择“Run”。
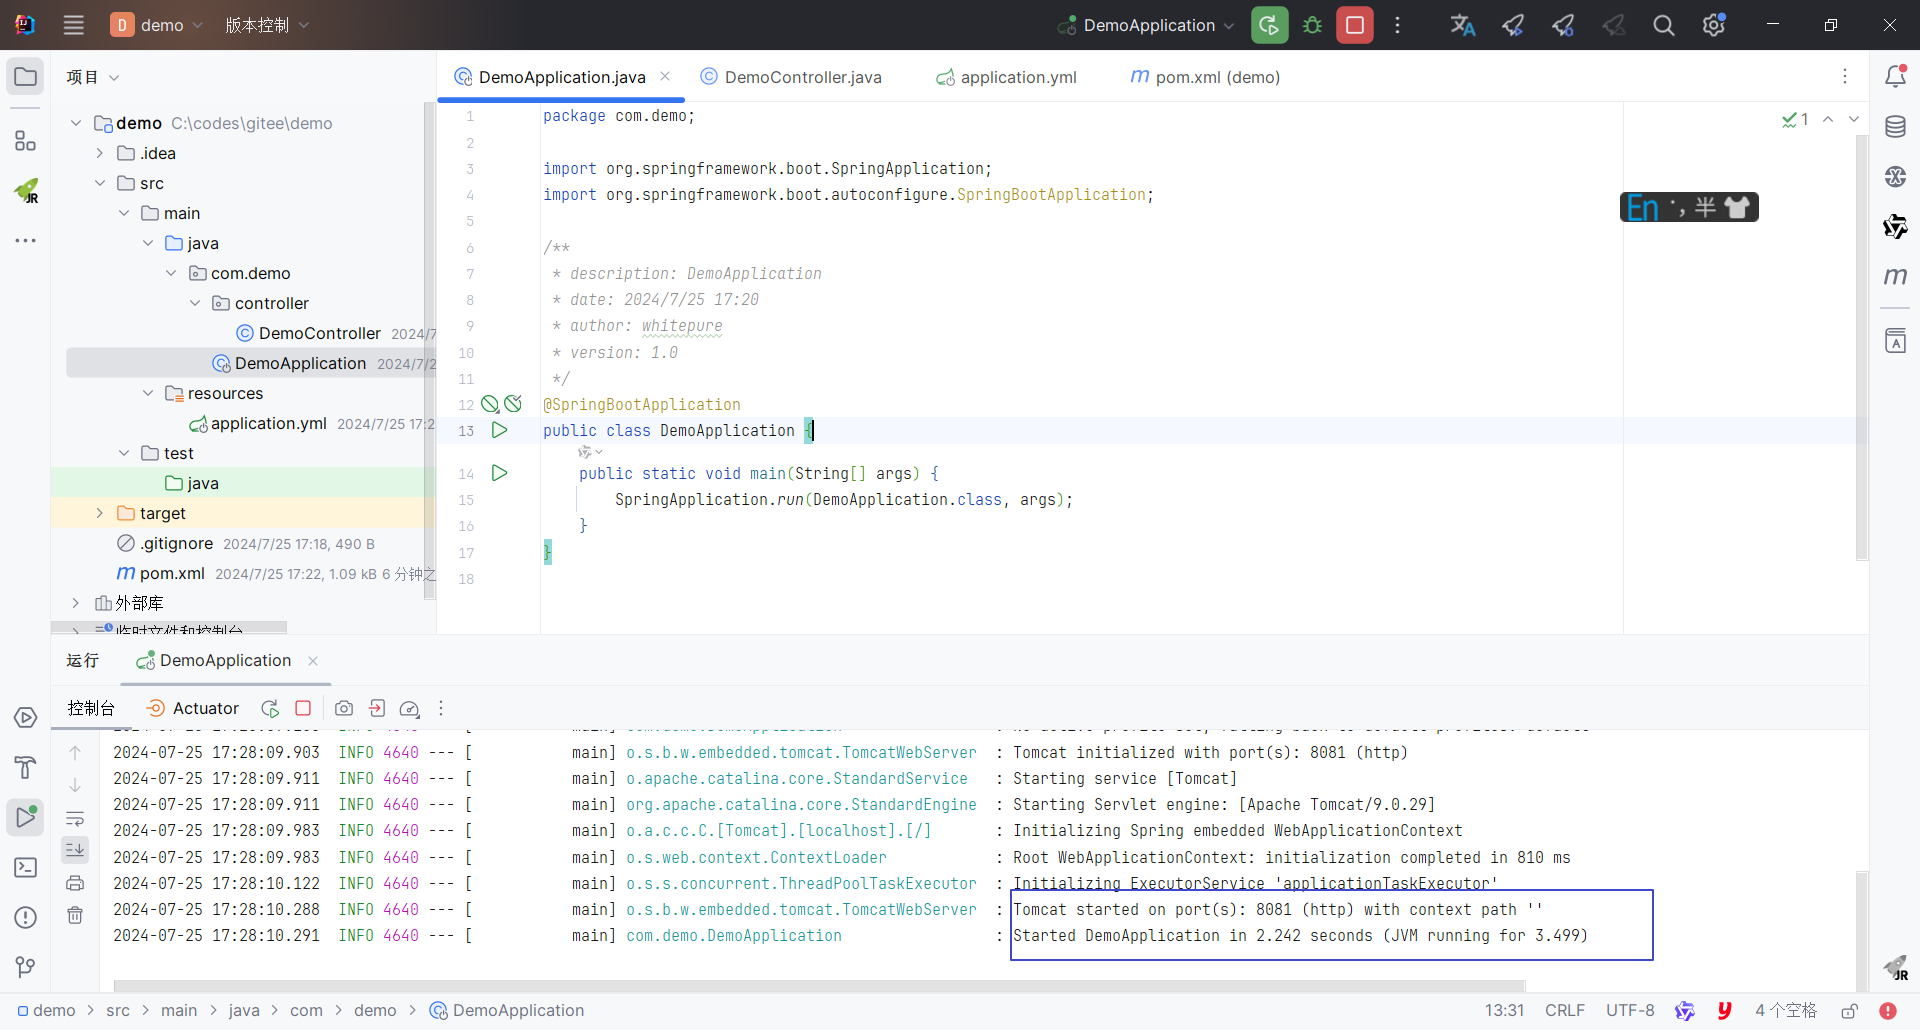
通过浏览器输入http://localhost:8081/api/hello 测试。

SpringBoot常用注解
在SpringBoot开发中,常用的注解简化了配置和开发流程。
@SpringBootApplication:标注在启动类上,它综合了@Configuration、@EnableAutoConfiguration和@ComponentScan注解,用于自动配置和组件扫描。@SpringBootApplication public class MyApplication { public static void main(String[] args) { SpringApplication.run(MyApplication.class, args); } }@RestController:是一个组合注解,结合了@Controller和@ResponseBody。用于定义控制器类,并将返回的对象自动转换为JSON或XML格式,简化了RESTful API的开发。@RestController @RequestMapping("/api") public class MyController { @GetMapping("/hello") public String sayHello() { return "Hello, World!"; } }@Controller:用于定义一个SpringMVC 控制器类,它的主要目的是处理Web请求并返回视图,如JSP、Thymeleaf模板等。@Controller public class MyController { @GetMapping("/home") public String home() { return "home"; // 返回视图名(例如 home.html) } }@RequestMapping:映射HTTP请求到控制器的方法。支持不同的请求方法(GET、POST等),其衍生注解为@GetMapping、@PostMapping、@PutMapping、@DeleteMapping。@RestController public class MyController { @RequestMapping(value = "/hello", method = RequestMethod.GET) public String getHello() { return "Hello, GET!"; } }@RequestBody:将HTTP请求体的内容绑定到方法参数上。通常用于POST请求,当请求的内容是JSON、XML或其他类型的数据时,可以通过@RequestBody注解将其自动转换为Java对象。@RestController public class MyRestController { @PostMapping("/submit") public String submitData(@RequestBody MyRequestData data) { // 处理数据 return "Data received: " + data.toString(); } } class MyRequestData { private String name; private int age; }@ResponseBody:将方法的返回值直接写入HTTP响应体中。常用于控制器方法,以使得返回的数据,通常是JSON或XML,能够被自动序列化并发送给客户端。@Controller @ResponseBody @RequestMapping("/api") public class MyRestController { @GetMapping("/info") public MyResponseData getInfo() { return new MyResponseData("Alice", 30); } } class MyResponseData { private String name; private int age; public MyResponseData(String name, int age) { this.name = name; this.age = age; } }@Autowired:自动注入Spring管理的Bean。可以用于构造函数、字段或setter方法。@Service public class MyService { private final MyRepository myRepository; @Autowired public MyService(MyRepository myRepository) { this.myRepository = myRepository; } }@Component:标记Spring组件,使其能够被自动扫描和管理,@Component为标记通用的Spring组件。@Service public class MyService { private final MyRepository myRepository; @Autowired public MyService(MyRepository myRepository) { this.myRepository = myRepository; } }@Service:标记Spring业务组件,用于业务逻辑处理。@Service public class MyService { // 业务逻辑 }@Repository:标记Spring数据访问组件,用于数据持久化。@Repository public class MyRepository { // 数据访问逻辑 }@Configuration:标记Spring配置类,用于配置Spring容器、配置Bean。@Configuration public class AppConfig { @Bean public MyBean myBean() { return new MyBean(); } }@Bean:在配置类中定义Bean方法,Spring管理这些Bean的生命周期。@Bean public MyBean myBean() { return new MyBean(); }@Value:从配置文件中注入值到字段,允许应用程序灵活地读取外部配置。@Component public class MyComponent { @Value("${my.property}") private String myProperty; }@ConfigurationProperties:用于将配置文件中的属性映射到Java类中。这样,配置可以作为一个JavaBean进行管理,便于在应用中使用。@ConfigurationProperties(prefix = "myapp") public class MyAppProperties { private String name; private int maxAttempts; // getters and setters }myapp.name=MyApplication myapp.maxAttempts=5@Conditional:用于根据条件判断是否应用特定的配置。@Conditional注解的核心是通过Condition接口的实现来控制Bean的创建。Spring在启动时会检查这些条件,只有当所有条件都满足时,相关的Bean才会被注册到Spring容器中。public class CustomCondition implements Condition { @Override public boolean matches(ConditionContext context, AnnotatedTypeMetadata metadata) { // 自定义条件逻辑 String property = context.getEnvironment().getProperty("custom.property"); return "expectedValue".equals(property); } }
SpringBoot自动配置
SpringBoot的自动配置通过条件化配置和扫描机制来简化应用设置。应用启动时,SpringBoot根据spring.factories文件中的配置自动加载所有标记为自动配置的类。
每个自动配置类使用条件注解,如@ConditionalOnClass、@ConditionalOnMissingBean等,来判断是否应该应用特定的配置。这些注解帮助决定是否创建和配置Bean。
如果符合条件,SpringBoot会自动生成所需的Bean实例并将其添加到应用上下文中。
其自动配置原理,是通过@SpringBootApplication注解,在启动时加载的。@SpringBootApplication这个注解通常标注在启动类上:
@SpringBootApplication
public class SpringBootExampleApplication {
public static void main(String[] args) {
SpringApplication.run(SpringBootExampleApplication.class, args);
}
}
@SpringBootApplication是一个复合注解,即由其他注解构成。核心注解是@SpringBootConfiguration和@EnableAutoConfiguration。
@Target(ElementType.TYPE)
@Retention(RetentionPolicy.RUNTIME)
@Documented
@Inherited
@SpringBootConfiguration
@EnableAutoConfiguration
@ComponentScan(excludeFilters = {
@Filter(type = FilterType.CUSTOM, classes = TypeExcludeFilter.class),
@Filter(type = FilterType.CUSTOM, classes = AutoConfigurationExcludeFilter.class) })
public @interface SpringBootApplication {}
@SpringBootConfiguration
@SpringBootConfiguration核心注解是@Configuration的作用是将类标记为配置类,可以定义@Bean方法来创建和配置 Spring容器中的Bean。
@Target({ElementType.TYPE})
@Retention(RetentionPolicy.RUNTIME)
@Documented
@Configuration
public @interface SpringBootConfiguration {}
@Configuration底层实现就是一个Component。
/**
* Indicates that an annotated class is a "component".
* Such classes are considered as candidates for auto-detection
* when using annotation-based configuration and classpath scanning.
*
*/
@Target(ElementType.TYPE)
@Retention(RetentionPolicy.RUNTIME)
@Documented
@Indexed
public @interface Component{}
@EnableAutoConfiguration
@EnableAutoConfiguration作用是启用SpringBoot的自动配置机制。它的核心是@AutoConfigurationPackage和@Import({AutoConfigurationImportSelector.class})
@Target({ElementType.TYPE})
@Retention(RetentionPolicy.RUNTIME)
@Documented
@Inherited
@AutoConfigurationPackage
@Import({AutoConfigurationImportSelector.class})
public @interface EnableAutoConfiguration {}
@AutoConfigurationPackage的核心是引入了一个@Import(AutoConfigurationPackages.Registrar.class)配置类,该类实现了ImportBeanDefinitionRegistrar接口。
这个注解本身的含义就是将主配置类(@SpringBootApplication标注的类)所在的包下面所有的组件都扫描到Spring容器中。
/**
* {@link ImportBeanDefinitionRegistrar} to store the base package from the importing
* configuration.
*/
static class Registrar implements ImportBeanDefinitionRegistrar, DeterminableImports {
@Override
public void registerBeanDefinitions(AnnotationMetadata metadata, BeanDefinitionRegistry registry) {
register(registry, new PackageImports(metadata).getPackageNames().toArray(new String[0]));
}
@Override
public Set<Object> determineImports(AnnotationMetadata metadata) {
return Collections.singleton(new PackageImports(metadata));
}
}
AutoConfigurationImportSelector类的作用是通过扫描spring.factories文件,加载所有自动配置类。
/**
* Return the auto-configuration class names that should be considered. By default
* this method will load candidates using {@link SpringFactoriesLoader} with
* {@link #getSpringFactoriesLoaderFactoryClass()}.
* @param metadata the source metadata
* @param attributes the {@link #getAttributes(AnnotationMetadata) annotation
* attributes}
* @return a list of candidate configurations
*/
protected List<String> getCandidateConfigurations(AnnotationMetadata metadata, AnnotationAttributes attributes) {
List<String> configurations = SpringFactoriesLoader.loadFactoryNames(getSpringFactoriesLoaderFactoryClass(),
getBeanClassLoader());
Assert.notEmpty(configurations, "No auto configuration classes found in META-INF/spring.factories. If you "
+ "are using a custom packaging, make sure that file is correct.");
return configurations;
}
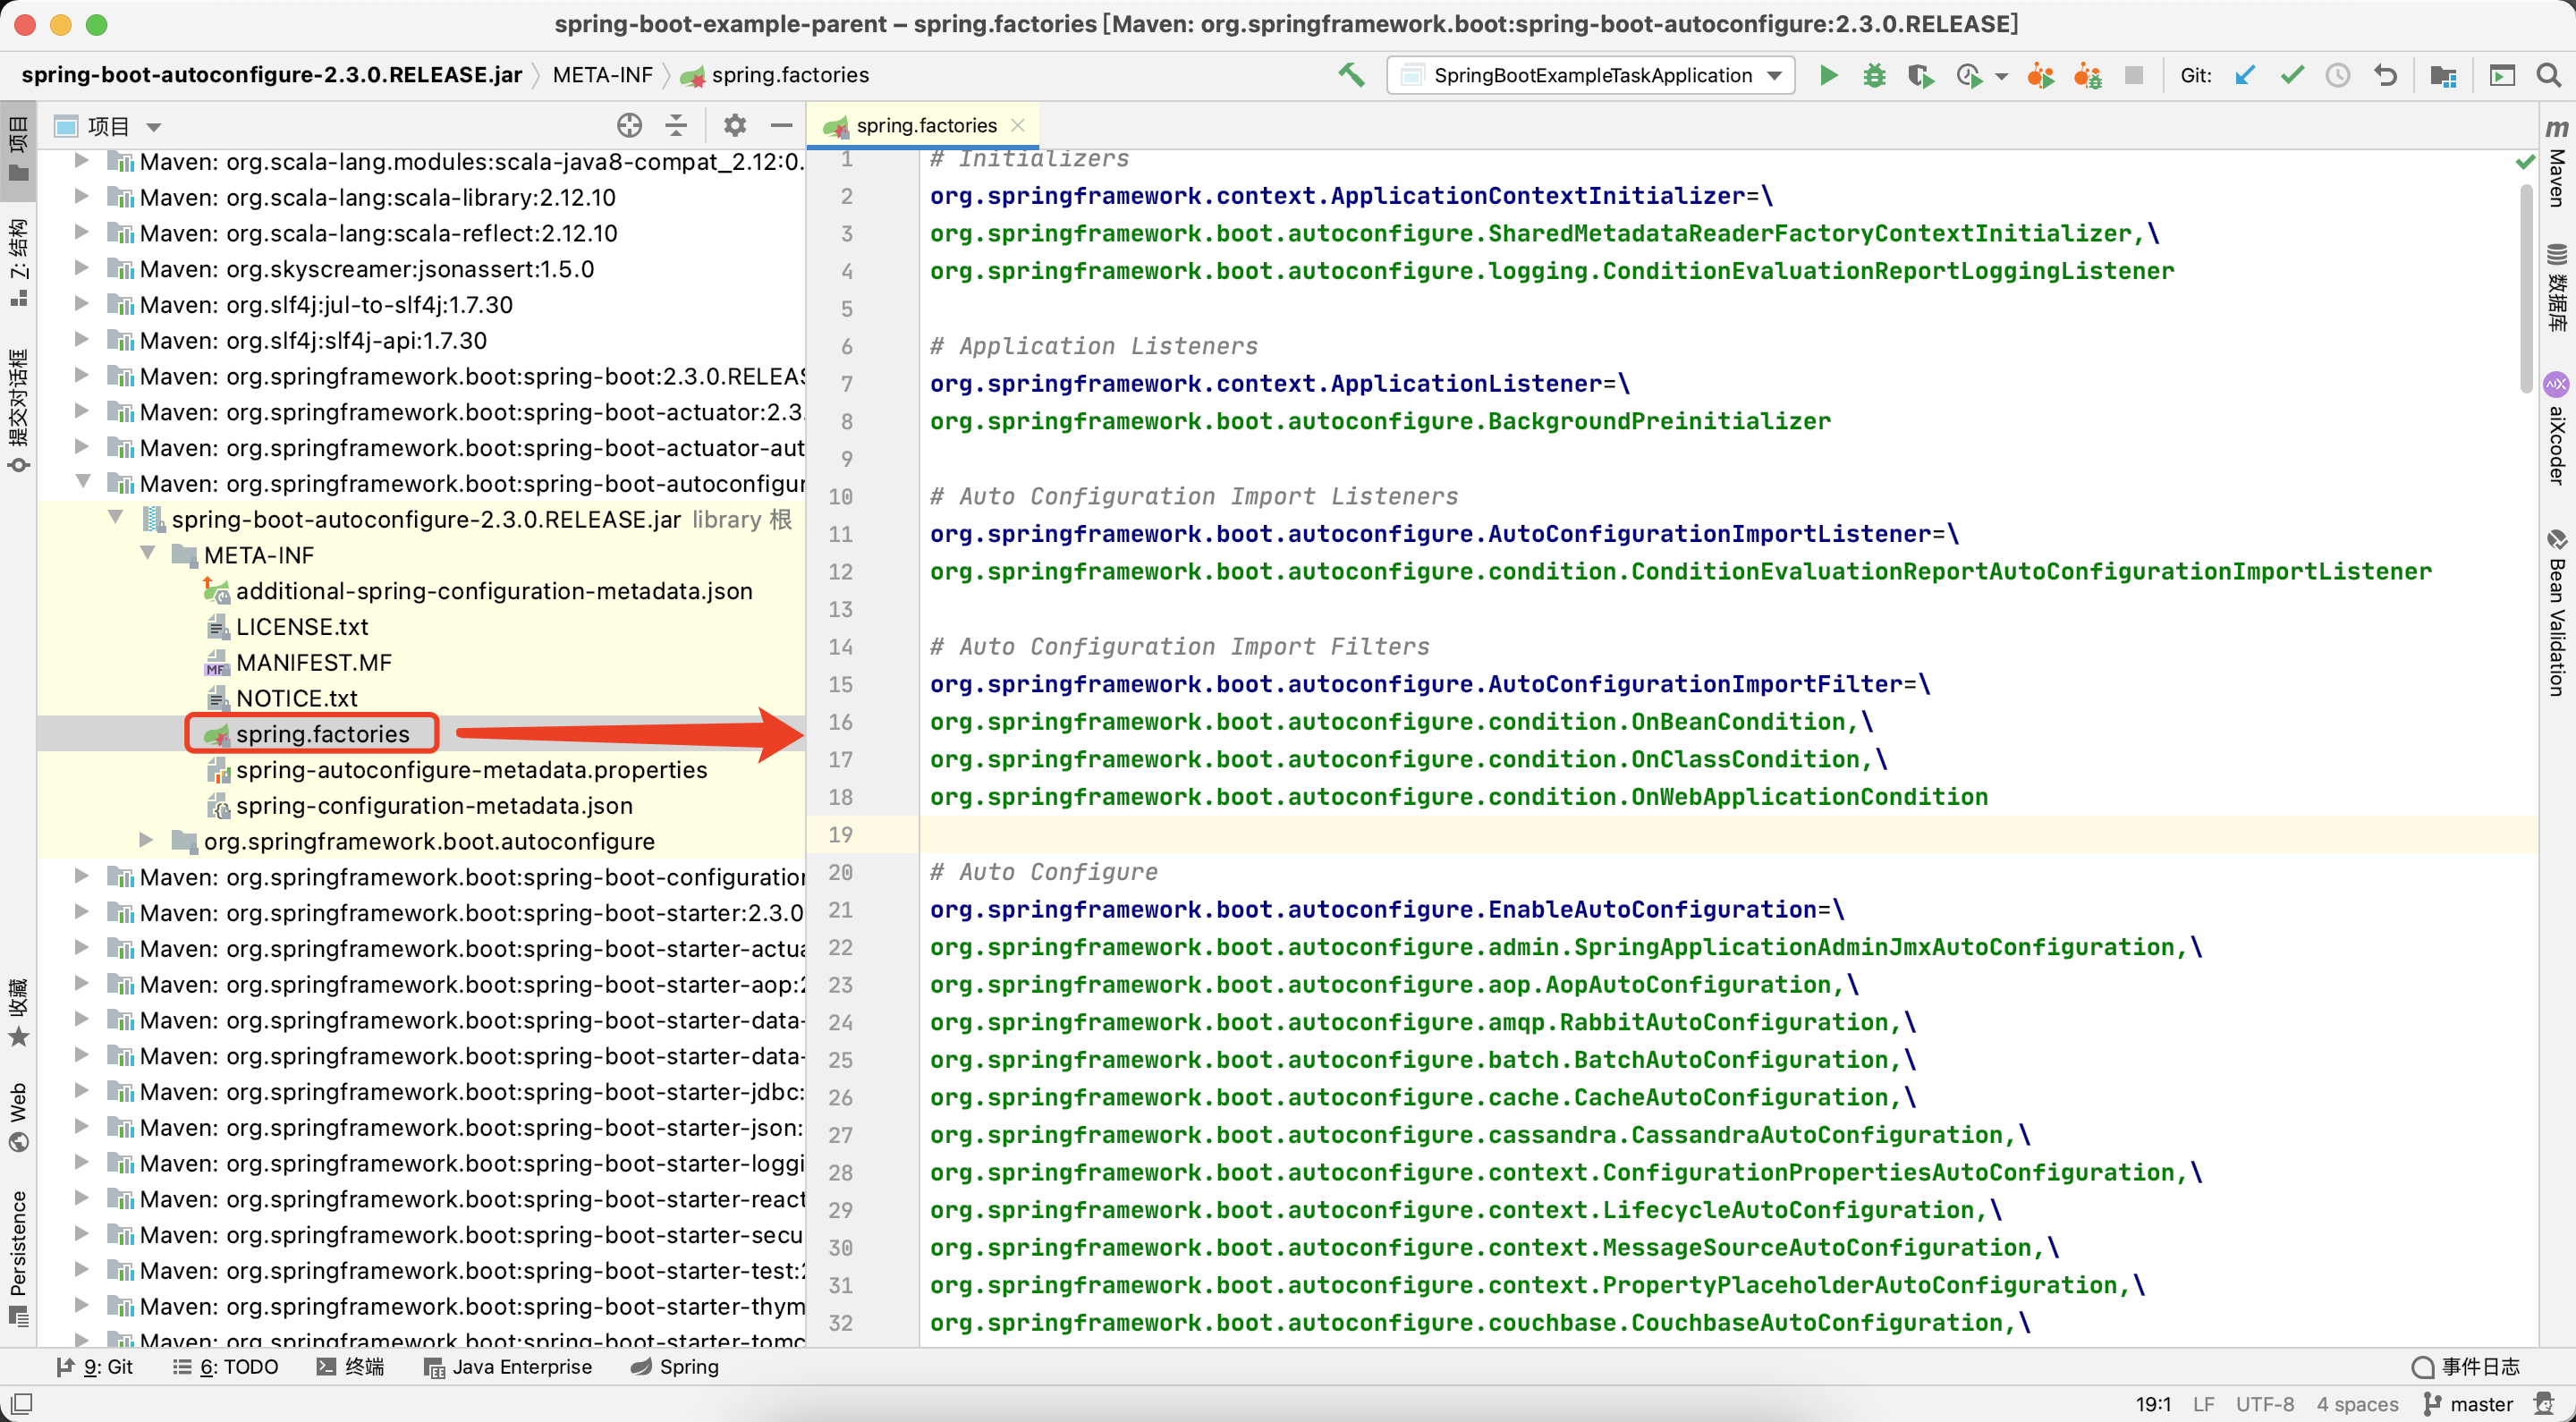
但是spring.factories包含了很多类,并不是全部都加载的,在某些类里面,是有一个条件@ConditionalOnXXX注解,只有当这个注解上的条件满足才会加载。如SpringApplicationAdminJmxAutoConfiguration。
@Configuration(proxyBeanMethods = false)
@AutoConfigureAfter(JmxAutoConfiguration.class)
@ConditionalOnProperty(prefix = "spring.application.admin", value = "enabled", havingValue = "true",matchIfMissing = false)
public class SpringApplicationAdminJmxAutoConfiguration {}
当一个类使用 @SpringBootApplication 注解时,SpringBoot会自动进行一系列配置,让应用快速启动并运行。这个注解包含了 @SpringBootConfiguration,相当于告诉 Spring这是一个配置类,就像使用了@Configuration一样。
@Configuration 的作用是将类标记为配置类,这个配置类可以定义 @Bean 方法来创建和配置 Spring容器中的 Bean。同时,@EnableAutoConfiguration 启用了SpringBoot的自动配置功能,SpringBoot会根据项目中的依赖,自动配置很多常用的 Spring组件,这样就不需要手动配置它们。
这个自动配置的过程是通过扫描spring.factories文件中的自动配置类来实现的。另外,@ComponentScan让 Spring自动扫描当前包及其子包下的所有组件,比如标注了 @Component、@Service、@Repository和@Controller的类,并把它们注册到Spring容器中。
因此,把应用的主类放在根包中,SpringBoot就会自动扫描并加载所有需要的组件和配置,让你可以专注于编写业务代码,而不用担心复杂的配置细节。SpringBoot通过这一系列自动化的配置和扫描机制,简化了开发和配置的工作量,让应用能够快速启动并运行。
SpringBoot配置管理
SpringBoot支持application.properties和application.yml两种格式的配置文件,通常放置在src/main/resources目录下。
server:
port: 8080
spring:
# 数据源配置
datasource:
url: jdbc:mysql://localhost:3306/mydb
username: root
password: secret
# 自定义属性
myapp:
name: MyApplication
maxAttempts: 5
如果想要读取配置,可以使用@Value注解或者@ConfigurationProperties注解。使用@ConfigurationProperties注解将配置文件中的属性绑定到Java类中,能够将复杂配置集中管理。
@ConfigurationProperties(prefix = "myapp")
public class MyAppProperties {
    private String name;
    private int maxAttempts;

    // getters and setters
}
使用@Value注解可以将配置文件中的单个属性注入到Bean的字段中。
@Component
public class MyComponent {
    @Value("${myapp.name}")
    private String appName;
}
但需要注意的是,并不是在配置文件中配置了,就一定会加载,SpringBoot配置的加载优先级由高到低依为:
- 命令行参数:命令行参数的配置优先级最高。当你启动SpringBoot应用时,可以通过命令行传递配置参数,这些参数会覆盖其他来源的配置。
java -jar myapp.jar -Dserver.port=9090 - 环境变量:环境变量的配置优先级低于命令行参数,但高于
application.properties和application.yml文件。环境变量通常用于在操作系统级别定义配置,例如在生产环境中。export SERVER_PORT=9090 application.properties或application.yml文件:这些文件通常位于src/main/resources目录下,提供了默认的配置。这些配置会被加载到应用程序上下文中,但它们的优先级低于命令行参数。server.port=8080- 系统属性:系统属性通过
System.setProperty方法设置,优先级最低。这些属性可以在应用启动时或者在JVM启动时通过-D参数设置,虽然优先级低于其他配置源,但它们仍然会被加载。System.setProperty("server.port", "9090");
除此之外可以使用application-{profile}.properties或application-{profile}.yml文件为不同的环境提供特定的配置。
且通过设置spring.profiles.active属性来激活特定的环境配置。
server.port=8081
# application.properties
spring.profiles.active=dev
有时需要根据特定条件加载不同的配置文件。这种需求通常出现在环境配置、特性开关或者动态调整配置的场景中,就可以通过环境控制的方式来实现。
application-dev.propertiesserver.port=8081 myapp.feature=enabledapplication-prod.propertiesserver.port=80 myapp.feature=disabled
在application.properties中激活特定的profile:
spring.profiles.active=dev
这样SpringBoot会根据激活的profile加载对应的配置文件。
其实使用@Profile注解也能实现环境控制,@Profile注解允许在特定的profile激活时创建Bean或配置类。结合@Configuration使用,可以在不同的环境中加载不同的Bean配置。
@Configuration
@Profile("dev")
public class DevConfiguration {
    @Bean
    public MyBean myBean() {
        return new MyBean("Development Bean");
    }
}
或者使用@Conditional,@Conditional注解允许根据条件决定是否加载配置。可以结合自定义条件来实现复杂的条件加载逻辑。
public class OnCustomCondition implements Condition {
    @Override
    public boolean matches(ConditionContext context, AnnotatedTypeMetadata metadata) {
        // 逻辑判断
        return "true".equals(System.getProperty("custom.condition"));
    }
}
@Configuration
@Conditional(OnCustomCondition.class)
public class CustomConditionConfiguration {
    @Bean
    public CustomBean customBean() {
        return new CustomBean();
    }
}
SpringBoot嵌入式服务器
SpringBoot提供了内置的Web服务器,如Tomcat、Jetty和Undertow,嵌入式的服务器功能使得构建和运行JavaWeb应用变得更加简单。
有了嵌入式的服务器就不需要将应用程序打包为WAR包并部署到外部服务器,直接打包为JAR文件即可运行。
而且运行和调试Web应用时不需要管理服务器的独立生命周期,而且内置服务器通常比外部服务器占用的资源少,启动速度更快。
SpringBoot默认内置Tomcat作为嵌入式服务器。如果没有特别修改,应用将使用Tomcat。
<dependency>
    <groupId>org.springframework.boot</groupId>
    <artifactId>spring-boot-starter-web</artifactId>
</dependency>
如果要使用Jetty代替Tomcat,需要在pom.xml中排除Tomcat并添加Jetty依赖。
<dependencies>
    <dependency>
        <groupId>org.springframework.boot</groupId>
        <artifactId>spring-boot-starter-web</artifactId>
        <exclusions>
            <exclusion>
                <groupId>org.springframework.boot</groupId>
                <artifactId>spring-boot-starter-tomcat</artifactId>
            </exclusion>
        </exclusions>
    </dependency>
    <dependency>
        <groupId>org.springframework.boot</groupId>
        <artifactId>spring-boot-starter-jetty</artifactId>
    </dependency>
</dependencies>
内置的服务器实际上,SpringBoot是通过自动配置机制来简化Web服务器的配置。应用启动时,SpringBoot会自动检测类路径中的依赖,并根据它们自动配置Web服务器。
自动配置类位于org.springframework.boot.autoconfigure.web.servlet包中,例如TomcatServletWebServerFactory、JettyServletWebServerFactory和UndertowServletWebServerFactory。
@Configuration
@ConditionalOnClass(Servlet.class)
@ConditionalOnMissingBean(ServletWebServerFactory.class)
@EnableConfigurationProperties(WebServerProperties.class)
public class TomcatServletWebServerFactoryConfiguration {
    @Bean
    public TomcatServletWebServerFactory tomcatServletWebServerFactory(WebServerProperties properties) {
        TomcatServletWebServerFactory factory = new TomcatServletWebServerFactory();
        // 配置 Tomcat 服务器
        return factory;
    }
}
SpringBoot使用ServletWebServerFactory接口及其实现,例如TomcatServletWebServerFactory来创建内嵌的Web服务器。ServletWebServerFactory提供了创建和配置Web服务器的能力。
当应用启动时,SpringBoot会创建一个ServletWebServerFactory实现的实例,并使用该实例启动Web服务器。
@Bean
public ServletWebServerFactory servletContainer() {
    TomcatServletWebServerFactory factory = new TomcatServletWebServerFactory();
    factory.setPort(8080);
    return factory;
}
可以通过实现TomcatServletWebServerFactory、JettyServletWebServerFactory或UndertowServletWebServerFactory接口来自定义嵌入式服务器的配置。
@Configuration
public class CustomTomcatFactory extends TomcatServletWebServerFactory {

    @Bean
    @Override
    public ServletWebServerFactory servletContainer() {
        return new TomcatServletWebServerFactory() {
            @Override
            protected Tomcat getTomcatEmbeddedServletContainer() {
                Tomcat tomcat = super.getTomcatEmbeddedServletContainer();

                // 自定义 Tomcat 配置
                tomcat.getConnector().setAttribute("maxThreads", 200);

                // 可以在这里添加更多自定义逻辑
                return tomcat;
            }
        };
    }
}
SpringBoot测试
测试是保证应用正确性和稳定性的关键部分,SpringBoot提供了多种测试工具和注解,以便于进行集成测试、单元测试和功能测试。
创建一个单元测试步骤:
- 导入测试依赖。
<dependencies>
    <!-- Spring Boot Test -->
    <dependency>
        <groupId>org.springframework.boot</groupId>
        <artifactId>spring-boot-starter-test</artifactId>
        <scope>test</scope>
    </dependency>
    <!-- JUnit 5 (Jupiter) -->
    <dependency>
        <groupId>org.junit.jupiter</groupId>
        <artifactId>junit-jupiter-api</artifactId>
        <scope>test</scope>
    </dependency>
    <dependency>
        <groupId>org.junit.jupiter</groupId>
        <artifactId>junit-jupiter-engine</artifactId>
        <scope>test</scope>
    </dependency>
</dependencies>
- 编写测试类。通常,测试类放在与主代码相同的包结构中的
src/test/java目录下。
@SpringBootTest
// @RunWith(xxxx.class)
public class MyServiceTests {

    @Autowired
    private MyService myService;

    @Test
    public void testPerformAction() {
        String result = myService.performAction();
        assertEquals("ExpectedResult", result);
    }
}
一个最简单的单元测试就创建完毕了。在实际测试中,有时候需要测试场景中加载配置,@TestConfiguration注解用于创建专门的测试配置类。
这些配置类仅在测试上下文中有效,用于提供测试所需的额外Bean。
@TestConfiguration
public class TestConfig {

    @Bean
    public TestService testService() {
        return new TestService();
    }
}
然后在测试类中引入该配置:
@SpringBootTest
@Import(TestConfig.class)
public class ServiceTests {

    @Autowired
    private TestService testService;

    @Test
    public void testService() {
        // 测试逻辑
    }
}
除了这些,还能使用@ExtendWith和自定义扩展,自定义扩展来添加额外的功能,如测试环境准备、清理操作等。
public class CustomExtension implements TestInstancePostProcessor, TestExecutionExceptionHandler {

    @Override
    public void postProcessTestInstance(Object testInstance, ExtensionContext context) {
        // Custom initialization
    }

    @Override
    public void handleTestExecutionException(ExtensionContext context, Throwable throwable) throws Throwable {
        // Custom exception handling
    }
}
在测试类中引入该扩展:
@ExtendWith(CustomExtension.class)
public class CustomExtensionTests {

    @Test
    public void testWithCustomExtension() {
        // Test logic
    }
}